
Continuous package building with poudriere and Jenkins on FreeBSD
In a previous handbook about Jenkins we have shown you how to install and configure Jenkins and how to set up a Jenkins job for building a software project.
We have also seen how we can use Jenkins for building a project’s documentation with Doxygen.
In this handbook we will continue with our Jenkins handbook series and we’ll see how we can use Jenkins for package building under FreeBSD.
The package building process will be initiated and managed by Jenkins and for all the heavy lifting of the package building itself we will use ports-mgmt/poudriere.
We all know that we can use ports-mgmt/tinderbox for this task already, but the purpose of this handbook is to show you one more thing you can use Jenkins for - continuous building and testing of packages for your systems.
Tinderbox also comes with a web interface and it is easy to schedule a build from just using the web interface.
On the other side ports-mgmt/poudriere is a command-line package test and build system and does not provide any web interface currently, but using Jenkins we will change that and we will use the nice web interface of Jenkins integrated with poudriere.
Another benefit of using poudriere with Jenkins rathen than using Tinderbox is that poudriere is quite easy to configure and manage and you won’t fall into the configuration hell a lot of users have been complaining about while configuring Tinderbox.
One more cool feature of poudriere, and I really like this - poudriere is able to perform incremental package builds.
For more information about poudriere, please refer to the official web page of poudriere.
The setup explained in this handbook is quite simple and can be described shortly in this way:
- Jenkins connects to the poudriere build server using SSH keys
- Jenkins runs a package build
- Syncing built packages back to Jenkins and making them available for
- installation
Something else to mention about our setup is that once we are ready with the package building we will make our packages available through Jenkins, so that we can start installing them right away.
So lets start!
Requirements
- root access or sudo rights
- Jenkins CI instance. For installation and configuration of Jenkins,
- please check this handbook
- ZFS pool with enough free space
- ports-mgmt/poudriere
- pkgng
Tested And Verified
The setup explained in this handbook has been tested and verified on:
- FreeBSD 9.0 system
- jenkins-1.472
- poudriere-1.5.3
- ZFS pool version 28
Configuration of the build server
First we start with the configuration of our build server and the installation of the required packages.
$ sudo make -C /usr/ports/ports-mgmt/poudriere install clean
$ sudo make -C /usr/ports/ports-mgmt/pkg install clean
Please note that the build server does not require to be converted to pkgng.
Configuration of poudriere
Now lets configure poudriere. To do that simply copy /usr/local/etc/poudriere.conf.sample to /usr/local/etc/poudriere.conf and edit the file. The options in the file are quite well documented so everything should be pretty simple to configure.
Below you can see the configuration I’ve used for poudriere in this setup:
ZPOOL=zroot
FTPHOST=ftp.freebsd.org
RESOLV_CONF=/etc/resolv.conf
POUDRIERE_DATA=/poudriere_data
BASEFS=/poudriere
USE_PORTLINT=no
USE_TMPFS=yes
DISTFILES_CACHE=/usr/ports/distfiles
CRONDIR=${BASEFS}/cron
Creating a ports tree for poudriere
Now that we have poudriere configured, lets create a FreeBSD Ports Tree to be used by poudriere.
To do that execute the command below on the build server:
$ sudo poudriere ports -c
Creating poudriere jails
For the purposes of this handbook we will create only one FreeBSD 9.0-RELEASE amd64 poudriere jail for package building.
So lets create the poudriere jail:
$ sudo poudriere jails -c -j 90amd64 -v 9.0-RELEASE -a amd64
poudriere is able to create legacy packages as well as pkgng packages. pkgng users who want to have pkgng packages created will need to execute the commands below in order to make poudriere pkgng-aware.
$ sudo mkdir /usr/local/etc/poudriere.d
$ sudo echo "WITH_PKGNG=yes" >
/usr/local/etc/poudriere.d/90amd64-make.conf
Creating a Jenkins user on the build server
Our Jenkins CI instance will be connecting to the poudriere build server over SSH and then running the package build, so we will need a Jenkins user with proper privileges in order to authenticate, run the build on the poudriere build server and afterwards sync the packages to the Jenkins CI instance.
In order to avoid confusion we will use the user jenkins-builder on the poudriere build server and jenkins user on the Jenkins CI instance.
In order to create the Jenkins user, login to the poudriere build server and execute the commands below:
$ sudo pw useradd jenkins-builder -m -s /bin/sh \
       -c "Jenkins CI Builder"
Then set a password for the newly created jenkins-builder user:
$ sudo passwd jenkins-builder
And now create the SSH keys for the jenkins-builder user on the build server.
$ sudo -u jenkins-builder ssh-keygen
One last thing we need to configure is to allow our jenkins-builder user to run poudriere builds, so edit your /usr/local/etc/sudoers file and allow jenkins-builder to run poudriere. Adding the below content to your /usr/local/etc/sudoers file would do the job:
jenkins-builder ALL=(root) NOPASSWD: /usr/local/bin/poudriere
Our build server with poudriere is now fully configured. In the next chapter of this handbook we will integrate Jenkins with poudriere.
Now it is time to create a Jenkins job that will do continuous building and testing of our packages.
Installing and configuring required Jenkins plugins
First we would need two Jenkins plugins installed which are the Jenkins PostBuildScript Plugin and the Jenkins Publish Over SSH Plugin
Jenkins PostBuildScript Plugin will be used to execute a shell script in the Post-build Actions section of our project for syncing the already built packages and the Jenkins Publish Over SSH Plugin will be used for connecting to our build server using SSH keys, performing the build process and afterwards syncing back to Jenkins the already built packages.
In order to install the plugins navigate to Manage Jenkins -> Manage Plugins -> Available and install the Jenkins PostBuildScript Plugin and Jenkins Publish Over SSH Plugin.
Before creating the Jenkins job we need to do some configuration of the Jenkins Publish Over SSH Plugin first.
To do that navigate to Manage Jenkins -> Configure System and scroll down to the SSH section as shown in the screenshot below.

In the SSH section we need to specify the location to the private SSH key used by the Jenkins instance, which in the above screenshot is /usr/local/jenkins/.ssh/id_rsa. The private SSH key for Jenkins you can create by logging into the Jenkins instance and executing the below command:
$ sudo -u jenkins ssh-keygen
Now copy the public SSH key for user jenkins (which should be in /usr/local/jenkins/.ssh/id_rsa) from the Jenkins CI instance to the poudriere build server so that we can connect to our build server and run package builds. To do that from the Jenkins instance execute the command below:
$ sudo -u jenkins ssh-copy-id jenkins-builder@poudriere.example.org
Remember that we are using jenkins-builder user on the poudriere build server and jenkins user on the Jenkins instance.
If you do not have ssh-copy-id(1) package installed then just copy-paste the public ssh key of jenkins user to /home/jenkins-builder/.ssh/authorized_keys on the build server. Test that you can succesfully connect to the build server from Jenkins as well when ready.
Now that we have configured SSH key connection between the build server and Jenkins instance, lets configure Jenkins itself so that it can use that connection.
To do that lets add our poudriere build server to the SSH Servers section in Jenkins as shown on the screenshot below. When ready click on the Test Configuration button to test the connection between Jenkins and the poudriere builder server.
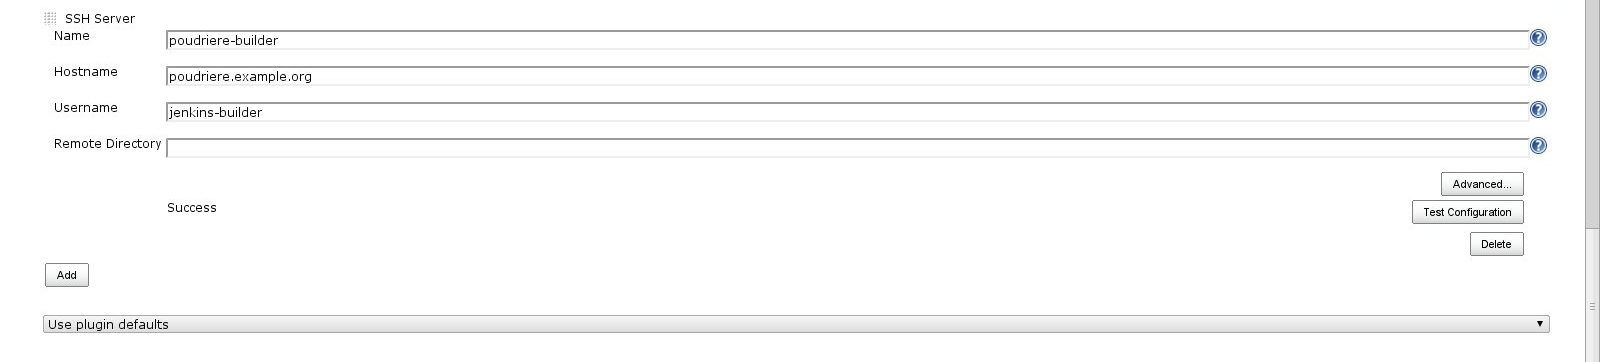
If the test was successful as shown on the screenshot above click on the Save button and we are ready with the configuration of the Jenkins Publish Over SSH Plugin.
Creating the Jenkins poudriere job
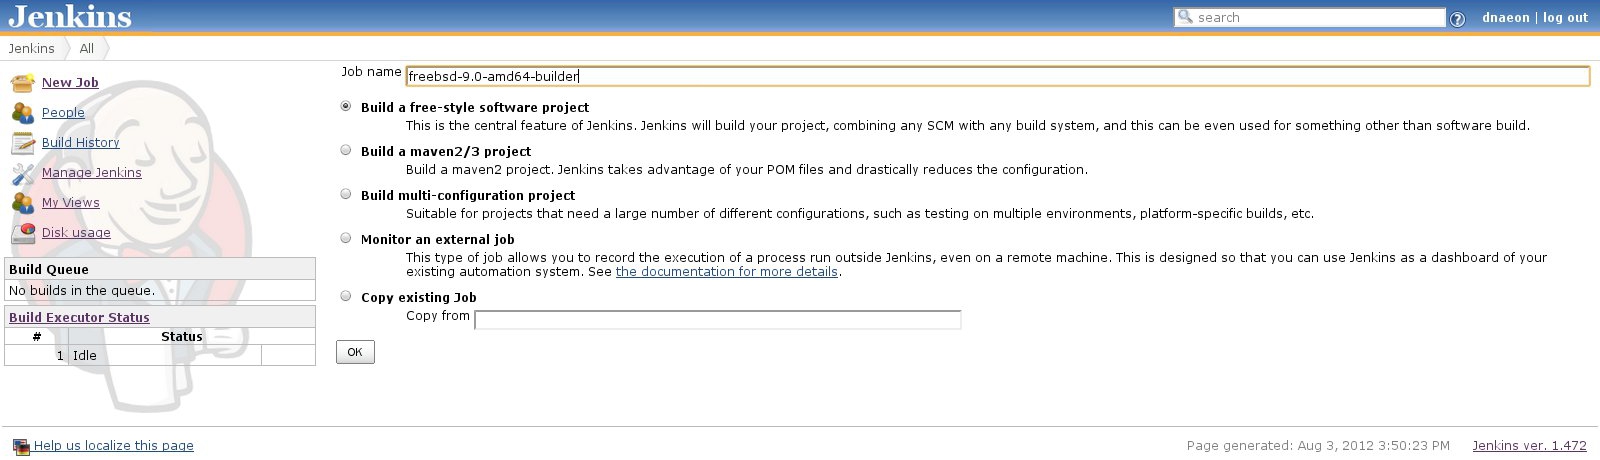
Now, lets create our Jenkins project for running poudriere package builds. Navigate to New Job and give the new project a meaningful name. In this example for the project name I will use the freebsd-9.0-amd64-builder name as shown on the screenshot below.
Once the new project is created we need to configure it - project description, SCM, number of builds to keep, etc.

We do not use an SCM system, so we leave the Source Code Management section of the project empty.

The next section we configure is the Build Triggers one. This is where we configure when a project is being scheduled for a build. I choose to leave this section of the project empty and trigger a build manually, but you may wish to enable periodic builds if needed. Feel free to play with this section of the project.

Now lets configure the build itself. This is where we define how we trigger the poudriere builds. To do that we configure the Build section of our project as shown in the screenshot below.
In order to add the build step click on the Add build step button from the Build section of the project and select the Send files or execute commands over SSH option.
Then select the poudriere-builder server and in the Exec command field we specify the commands used for building the packages as shown in the screenshot below.
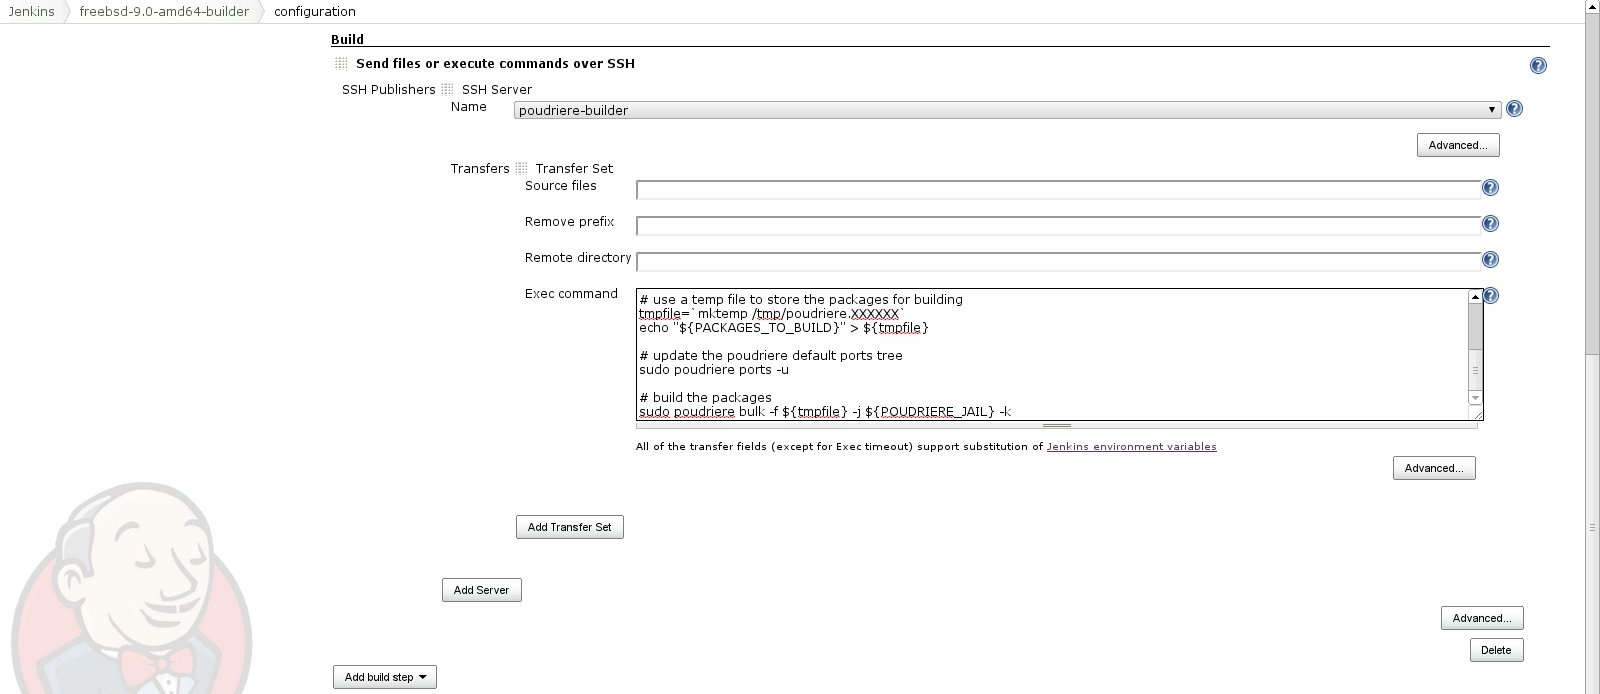
The Build section of the project is a simple shell script that takes care of building our packages with poudriere.
Below is listed the shell script used for building the packages with poudriere:
# poudriere jail
POUDRIERE_JAIL="90amd64"

# packages to be built
PACKAGES_TO_BUILD="security/apg
ports-mgmt/pkg
sysutils/zfsnap
ports-mgmt/poudriere
shells/zsh"

# use a temp file to store the packages for building
tmpfile=`mktemp /tmp/poudriere.XXXXXX`
echo "${PACKAGES_TO_BUILD}" > ${tmpfile}

# update the poudriere default ports tree
sudo poudriere ports -u

# build the packages
sudo poudriere bulk -f ${tmpfile} -j ${POUDRIERE_JAIL} -k

# show jail information after build has finished
sudo poudriere jails -i -j ${POUDRIERE_JAIL}

# remove the temp file
rm -f ${tmpfile}
There are only two things you need to change in the above script - the poudriere jail you are building packages on as defined by POUDRIERE_JAIL variable and the packages you want to build as defined by the PACKAGES_TO_BUILD variable.
In the above example script we are going to build the packages below on the 90amd64 poudriere jail:
- security/apg
- ports-mgmt/pkg
- sysutils/zfsnap
- ports-mgmt/poudriere
- shells/zsh
Now lets configure the Advanced settings of our project, to do that click on the Advanced* button and check the Fail the build if an error occurs as shown in the screenshot below:

One last thing we need to configure in the Build section of our project is to check the Exec in pty option and set the Exec timeout as shown in the screenshot below. We set the Exec timeout to 0 as we don’t know how long a build is going to last.

The last thing we need to configure about our project is to sync the already built packages back to Jenkins so that we can make them available for installation. To do that we configure the Post-build Actions section of our project.
In the Post-build Actions section of your project click on the Post-build action button and select [PostBuildScript] - Execute a set of scripts then from the Build steps select Execute shell as shown in the screenshot below:
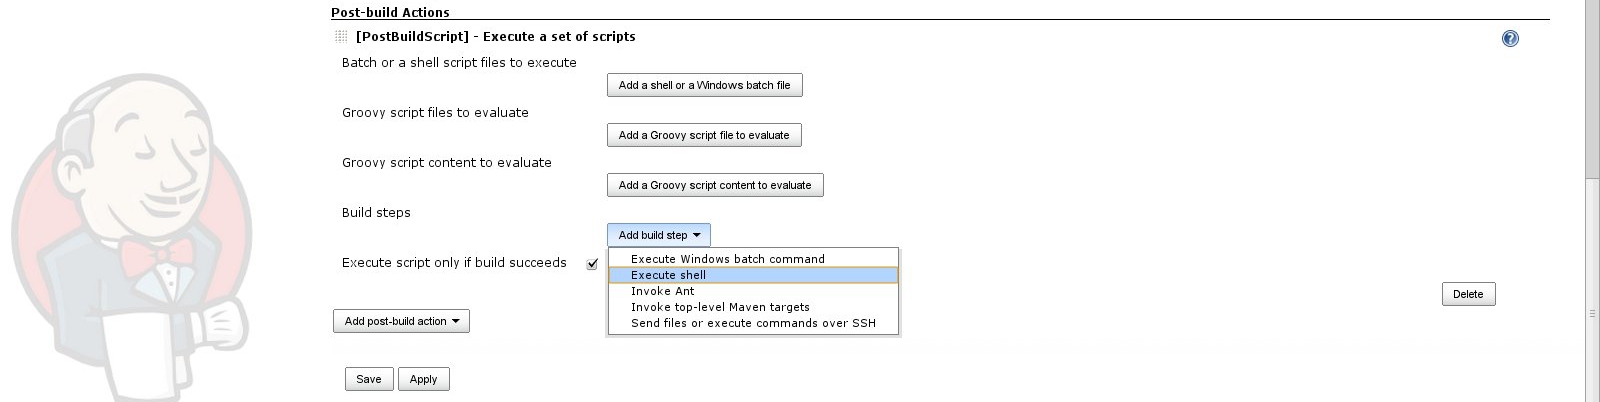
Our shell script in the Post-build Actions section only serves for syncing the packages from the build server to the Jenkins instance and is configured as shown on the screenshot below.
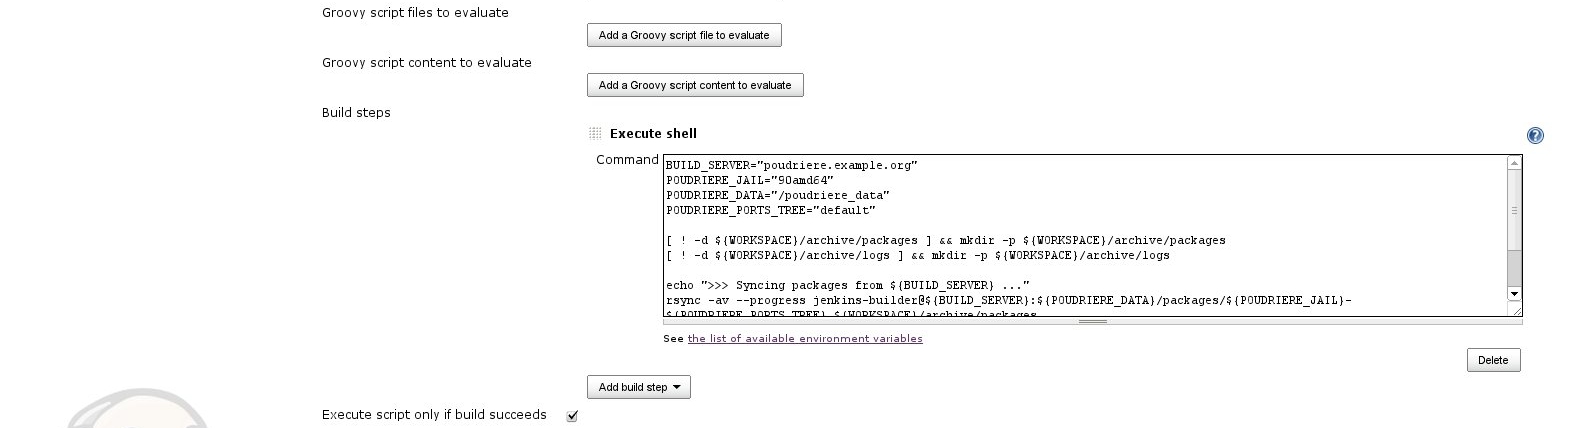
The sync script used in the Post-build Actions section is listed below:
BUILD_SERVER="poudriere.example.org"
POUDRIERE_JAIL="90amd64"
POUDRIERE_DATA="/poudriere_data"
POUDRIERE_PORTS_TREE="default"

[ ! -d ${WORKSPACE}/archive/packages ] && mkdir -p
${WORKSPACE}/archive/packages
[ ! -d ${WORKSPACE}/archive/logs ] && mkdir -p
${WORKSPACE}/archive/logs

echo ">>> Syncing packages from ${BUILD_SERVER} ..."
/usr/local/bin/rsync -av \
 --progress \
 jenkins-builder@${BUILD_SERVER}:${POUDRIERE_DATA}/packages/${POUDRIERE_JAIL}-${POUDRIERE_PORTS_TREE} ${WORKSPACE}/archive/packages

echo ">>> Syncing logs from ${BUILD_SERVER} ..."
/usr/local/bin/rsync -av \
 --progress \
 jenkins-builder@${BUILD_SERVER}:${POUDRIERE_DATA}/logs/${POUDRIERE_JAIL}-${POUDRIERE_PORTS_TREE}-*.log ${WORKSPACE}/archive/logs
You will need to adjust the below variables to match your setup:
- BUILD_SERVER - your poudriere build server
- POUDRIERE_JAIL - your poudriere jail used for building packages
- POUDRIERE_DATA as defined in /usr/local/etc/poudriere.conf
- POUDRIERE_PORTS_TREE the Ports Tree used by poudriere, which is
- set to *default by default
Once ready click on the Save button and do a test build of the project.
And our poudriere Jenkins job is fully configured! Now we can do a test build of our project.
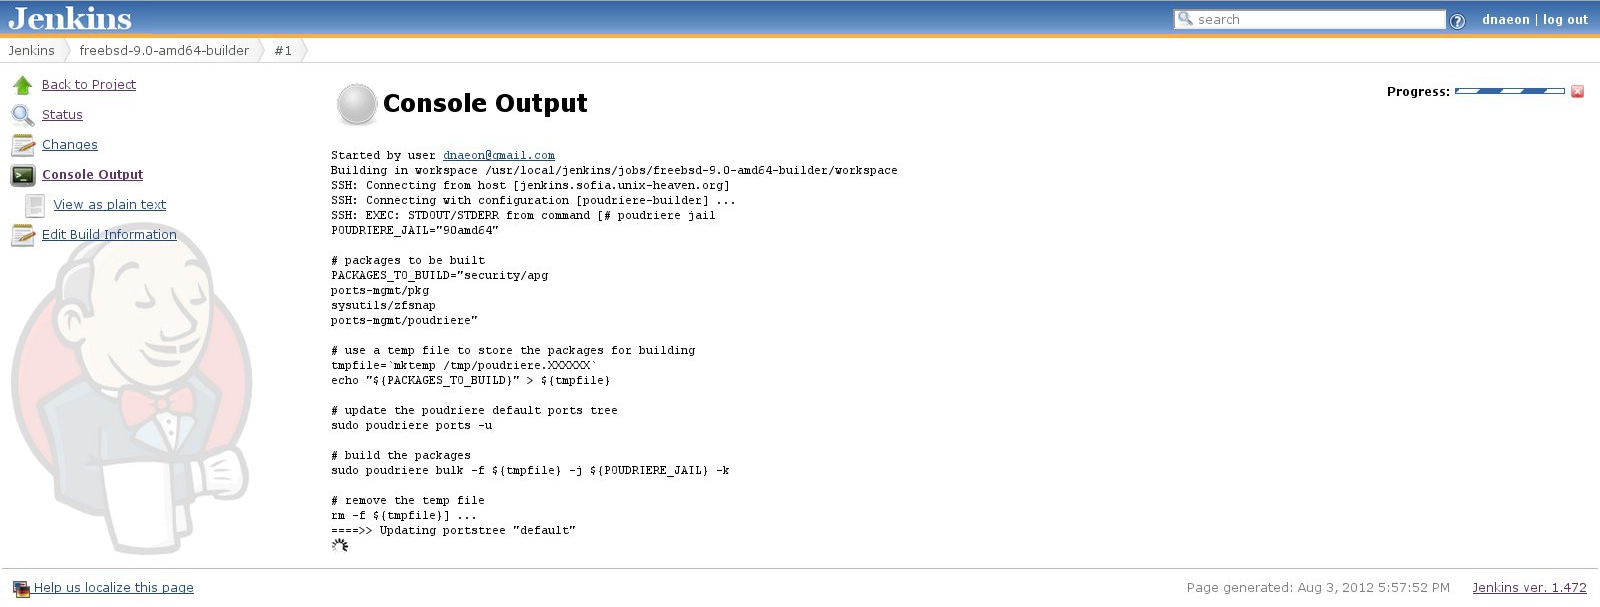
Running a package build
In order to trigger a build of our poudriere Jenkins project navigate to your newly created Jenkins project and click on the Build Now button.
You can monitor the output of the package building by clicking on the Console Output button in the Jenkins build.
Example screenshots of Jenkins building packages with poudriere can be seen below.
Once the packages have been built you will be able to browse them and view the log files when you go to the project’s Workspace as shown on the screenshot below.
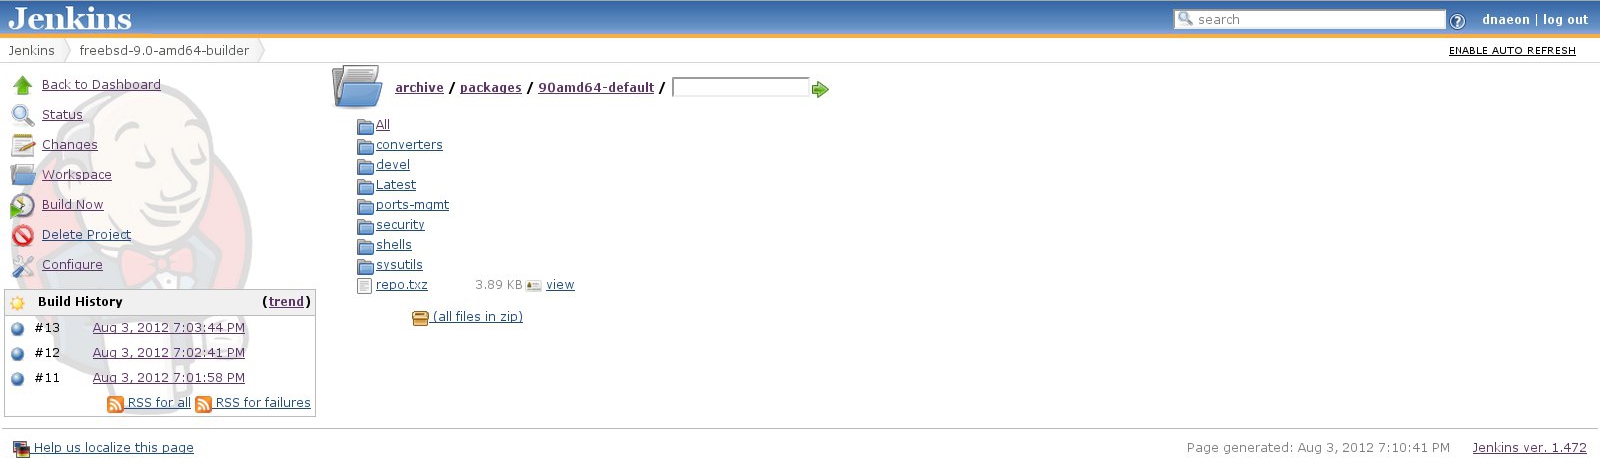
As you can see from the above screenshot we now have a ready-to-use pkgng repository and can install packages right away, e.g.
$ env PACKAGESITE=http://jenkins.example.org/job/9.0-amd64/ install zsh
And that would install shells/zsh from the pkgng repository hosted at the Jenkins CI instance.
Adding more poudriere builders to our setup
Adding more poudriere builders in Jenkins is easy - what you need in order to have a new poudriere builder in Jenkins can be summarized in the following way:
- Create a new poudriere jail, e.g
sudo poudriere jails -c -j 91amd64 -v 9.1-RELEASE -a amd64- Clone an already existing Jenkins builder and edit only the variables in the scripts like POUDRIERE_JAIL, BUILD_SERVER, etc..
- Run a build on your new Jenkins poudriere builder
And that’s it, cloning an existing builder in Jenkins is easy, to do that simply navigate to New Job -> Copy existing Job, provide the new job a name and select an already existing Jenkins builder.
Further reading
As we’ve seen in this handbook we can use Jenkins CI for continuous package building. We have seen how to configure a Jenkins project that does continuous building and testing of packages on our FreeBSD systems.
In this handbook we’ve configured only a single Jenkins job for package building, but one can imagine that we can simply extend this setup to include multiple servers in a build farm managed by Jenkins.
Hope you’ve enjoyed reading the handbook and it was useful to you!