
Installing and configuring Squid and DansGuardian on FreeBSD
In the following handbook we will show you how to install and configure Squid acting as a transparent proxy server and DansGuardian for content filtering on a FreeBSD system.
Squid is a caching proxy server, which is used for reducing network bandwidth usage and accelerating the web content.
From the official site of Squid:
Squid is a caching proxy for the Web supporting HTTP, HTTPS, FTP, and more. It reduces bandwidth and improves response times by caching and reusing frequently-requested web pages. Squid has extensive access controls and makes a great server accelerator. It runs on most available operating systems, including Windows and is licensed under the GNU GPL.
For more information about Squid, please visit the official website of Squid.
In the second part of the handbook we will see how to install and configure DansGuardian - a web content filtering system.
From the official site of DansGuardian:
DansGuardian is an award winning Open Source web content filter which currently runs on Linux, FreeBSD, OpenBSD, NetBSD, Mac OS X, HP-UX, and Solaris. It filters the actual content of pages based on many methods including phrase matching, PICS filtering and URL filtering. It does not purely filter based on a banned list of sites like lesser totally commercial filters.
For more information about DansGuardian, please visit the official site of DanGuardian.
This setup has been tested and confirmed to be running successfully on a FreeBSD 8.2 system.
The important thing about our setup is that our firewall and gateway are running on the same machine as Squid and DansGuardian are, in order to have transparent proxy capabilities.
Requirements
- root access or sudo rights
- Basic understand of the [OpenBSD Packet
- Filter](http://www.openbsd.org/faq/pf/)
- Your machine is configured and works as the gateway and firewall for
- your network. Please have a look at the [Gateways and Routes chapter
- of the FreeBSD
- Handbook](http://www.freebsd.org/doc/en_US.ISO8859-1/books/handbook/network-routing.html)
- for more information.
Installation of Squid
The first part of the handbook covers the installation and configuration of Squid.
In order to install Squid we will use the FreeBSD Ports Collection.
Let’s start with the installation of Squid:
$ cd /usr/ports/www/squid && sudo make install clean
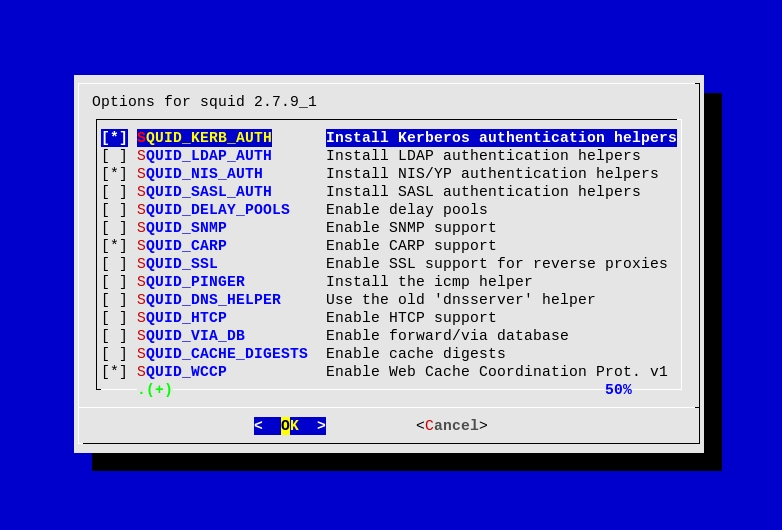
- SQUID_LDAP_AUTH
- SQUID_DELAY_POOLS
- SQUID_CARP
- SQUID_WCCP
- SQUID_IDENT
- SQUID_ARP_ACL
- SQUID_PF
- SQUID_FOLLOW_XFF
- SQUID_KQUEUE
- SQUID_SSL
- SQUID_REFERER_LOG
- SQUID_USERAGENT_LOG
- SQUID_ARP_ACL
- SQUID_LARGEFILE
Once the installation of Squid is over you should see something similar:
===> post-installation information for squid-2.7.9_1:

     o You can find the configuration files for this package in the
       directory /usr/local/etc/squid.

     o The default cache directory is /var/squid/cache.
       The default log directory is /var/squid/logs.

       Note:
       You must initialize new cache directories before you can start
       squid.  Do this by running "squid -z" as 'root' or 'squid'.
       If your cache directories are already initialized (e.g. after an
       upgrade of squid) you do not need to initialize them again.

     o The default configuration will deny everyone but local networks
       as defined in RFC 1918 access to the proxy service.
       Edit the "http_access allow/deny" directives in
       /usr/local/etc/squid/squid.conf to suit your needs.

     To enable Squid, set squid_enable=yes in either
     /etc/rc.conf, /etc/rc.conf.local or /etc/rc.conf.d/squid
     Please see /usr/local/etc/rc.d/squid for further details.

     Note:
     If you just updated your Squid installation from 2.6 or earlier,
     make sure to check your Squid configuration against the 2.7 default
     configuration file /usr/local/etc/squid/squid.conf.default.

     Additionally, you should check your configuration by calling
     'squid -f /path/to/squid.conf -k parse' before starting Squid.

===>   Compressing manual pages for squid-2.7.9_1
===>   Registering installation for squid-2.7.9_1
===> SECURITY REPORT:
      This port has installed the following files which may act as network
      servers and may therefore pose a remote security risk to the system.
/usr/local/sbin/squid

      This port has installed the following startup scripts which may cause
      these network services to be started at boot time.
/usr/local/etc/rc.d/squid

      If there are vulnerabilities in these programs there may be a security
      risk to the system. FreeBSD makes no guarantee about the security of
      ports included in the Ports Collection. Please type 'make deinstall'
      to deinstall the port if this is a concern.

      For more information, and contact details about the security
      status of this software, see the following webpage:
http://www.squid-cache.org/
===>  Cleaning for squid-2.7.9_1
Configuration of Squid
Squid’s main configuration file resides in /usr/local/etc/squid/squid.conf.
Open /usr/local/etc/squid/squid.conf file for editing and do the necessary changes. Most options are self explanatory.
Below you will find a fully working squid.conf file. Please consult the Squid man pages and the example /usr/local/etc/squid/squid.conf.default file for more information about the different options - the file is pretty well documented.
#
# ACL lists
#

acl all src all
acl manager proto cache_object
acl localhost src 127.0.0.1/32
acl to_localhost dst 127.0.0.0/8 0.0.0.0/32

acl SSL_ports port 443
acl Safe_ports port 80          # http
acl Safe_ports port 21          # ftp
acl Safe_ports port 443         # https
acl Safe_ports port 70          # gopher
acl Safe_ports port 210         # wais
acl Safe_ports port 1025-65535  # unregistered ports
acl Safe_ports port 280         # http-mgmt
acl Safe_ports port 488         # gss-http
acl Safe_ports port 591         # filemaker
acl Safe_ports port 777         # multiling http

acl CONNECT method CONNECT
acl PURGE   method PURGE

acl intranet_subnet src 10.1.16.0/20
acl openvpn_subnet  src 10.1.32.0/20

#
# General options
#

http_port <firewall-ip-address>:3128 transparent

visible_hostname <firewall-fqdn>

cache_mgr admin@example.org
ftp_user  squid@example.org

minimum_object_size 0 KB
maximum_object_size 1024 MB

request_body_max_size 0

hierarchy_stoplist cgi-bin ?

always_direct allow all

access_log /var/squid/logs/access.log squid

coredump_dir /var/squid/cache

#
# Permissions order - 1st comes, 1st served
#

icp_access  allow all
miss_access allow all

http_access allow PURGE             localhost
http_access allow manager           localhost
http_access allow intranet_subnet
http_access allow openvpn_subnet
http_access deny all
The most important things from the above configuration that you need to change for your setup are the ones listed below:
- *http_port
:3128 transparent* - change * * with your firewall's IP address - *visible_hostname
* - change * * *with your firewall's FQDN name. - cache_mgr admin@example.org - put your administrator’s email *address here
- intranet_subnet and openvpn_subnet are two subnets that we *allow access to our proxy server.
Again, please consult the example squid.conf.default configuration file for more explanation of the options used above.
Fine tuning FreeBSD to meet Squid’s requirements
To fine tune FreeBSD in order to be able to open more files and processes, add the below lines to your /boot/loader.conf file.
kern.maxfiles="12328"
kern.maxfilesperproc="11095"
kern.maxproc="6164"
kern.maxprocperuid="5547"
kern.maxusers="256"
You might want to play a bit with these settings, if they do not match your requirements and raise the values.
Enabling Squid during boot-time.
In order to enable Squid during boot-time add the following lines to your /etc/rc.conf file:
# Enable Squid
squid_enable="YES"
Firewall configuration in PF
In order to be able to pass connections transparently to the proxy server we need to add some rules to our /etc/pf.conf file.
Below is an example configuration of a /etc/pf.conf file for our transparent Squid proxy setup.
ext_if = "<external-interface>"
int_if = "<internal-interface>"

# --- IP given by the ISP ---
ip_addr = "x.x.x.x"

# --- squid server ip address (usually the localhost) ---
SQUID_SERVER = "x.x.x.x"

# --- squid port ---
SQUID_PORT = "3128"

# --- hosts with internet access from the private network ---
table <allowed> { 10.1.16.0/20 }

# --- openvpn clients subnet ---
table <openvpn_clients> { 10.1.32.0/20 }

# --- OPTIONS section ---
set skip on lo0
set block-policy return

# --- SCRUB section ---
scrub in all

# --- TRANSLATION (NAT/RDR) section ---
nat on $ext_if from <allowed> to any -> $ip_addr
nat on $ext_if from <openvpn_clients> to any -> $ip_addr

# --- redirect HTTP traffic to the Squid server on the firewall ---
rdr on $int_if inet proto tcp from any to any port www ->
$SQUID_SERVER port $SQUID_PORT

# --- FILTER RULES ---

# --- default policy ---
block log all

# --- antispoof protection ---
antispoof quick for $ext_if inet
antispoof quick for $int_if inet

# --- INTERNAL interface ---

pass in quick on $int_if inet from <allowed> to any keep state
pass in quick on $int_if inet from <openvpn_clients> to any keep state
pass out quick on $int_if inet from any to any keep state

# --- EXTERNAL interface ---

pass out quick on $ext_if inet from any to any keep state
Reload pf(4) rules using pfctl(8).
$ sudo pfctl -f /etc/pf.conf
Starting Squid
The first thing we need to do before starting Squid is to check our configuration if it contains any errors:
$ sudo squid -f /usr/local/etc/squid/squid.conf -k parse
If everything is OK we can proceed, otherwise you will need to check your squid.conf file and fix the reported errors.
Now we need to initialize the cache directories of Squid. To do this simply execute the command below:
$ sudo squid -z
NOTE: If you are doing an upgrade of Squid you do not need to initialize the cache directories as they should be initialized already.
And now let’s start Squid:
$ sudo /usr/local/etc/rc.d/squid start
If you have followed the handbook by this step you should have a fully working Squid transparent proxy server.
In the next chapters of this handbook we will have a look at DansGuardian and how to integrate it with Squid.
In this chapter of the handbook we will cover the installation and basic configuration of DansGuardian.
Installing Dansguardian
In order to install DansGuardian on your FreeBSD system you will need first to fetch the distribution tarball from the DansGuardian web site and place it in your /usr/ports/distfiles directory.
Once you do that we can continue with the installation of DansGuardian using the FreeBSD Ports Collection.
$ cd /usr/ports/www/dansguardian && sudo make install clean
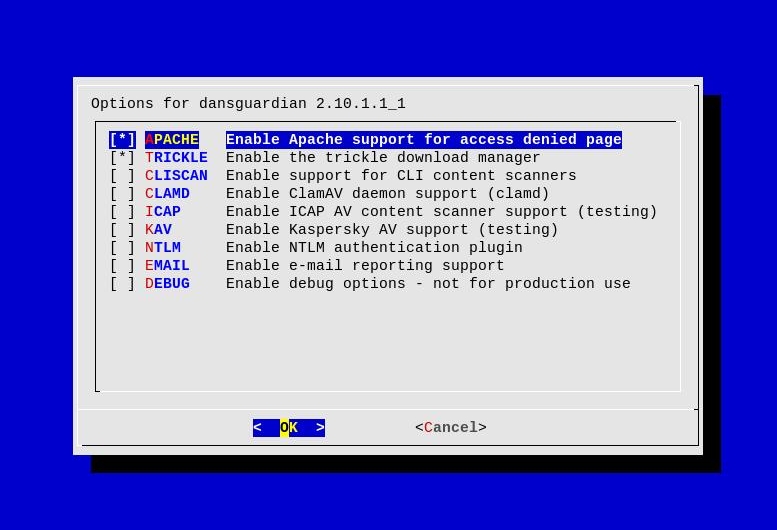
Once the installation of DansGuardian is over you should see something similiar:
===> Installing rc.d startup script(s)
===>   Please Note:

*******************************************************************************
       This port has created a log file named dansguardian.log that can get
       quite large.  Please read the newsyslog(8) man page for instructions
       on configuring log rotation and compression.

       This port has been converted to the new RC framework and should work
       correctly via rcorder.  Please read the comments in the startup script
       for instructions on enabling the daemon.

       WITH_CLAMAV, WITH_ICAP, WITH_KASP, WITH_NTLM are all experimental
       options that I am not currently able to test.  Let me know how these
       work (or not) for you.  (Patches always welcome.)
*******************************************************************************
===>   Compressing manual pages for dansguardian-2.10.1.1_1
===>   Registering installation for dansguardian-2.10.1.1_1
===> SECURITY REPORT:
      This port has installed the following files which may act as network
      servers and may therefore pose a remote security risk to the system.
/usr/local/sbin/dansguardian

      This port has installed the following startup scripts which may cause
      these network services to be started at boot time.
/usr/local/etc/rc.d/dansguardian

      If there are vulnerabilities in these programs there may be a security
      risk to the system. FreeBSD makes no guarantee about the security of
      ports included in the Ports Collection. Please type 'make deinstall'
      to deinstall the port if this is a concern.

      For more information, and contact details about the security
      status of this software, see the following webpage:
http://dansguardian.org
===>  Cleaning for dansguardian-2.10.1.1_1
Now that DansGuardian has been installed we can continue with it’s configuration in the next chapter of the handbook.
Configuration of Dansguardian
In this section we only cover the basic configuration of DansGuardian.
You are also advised to check the documentation of the DansGuardian web site for more information about DansGuardian.
The main DansGuardian configuration file resides in /usr/local/etc/dansguardian/dansguardian.conf. The file is pretty well documented and in this handbook we will only change a few options in order to match our setup.
So open the /usr/local/etc/dansguardian/dansguardian.conf file for editing and do the needed changes.
In this example we change only the following options.
filterip = <dansguardian-ip-address>
filterport = 8080 # dansguardian port
proxyip = <squid-ip-address>
proxyport = 3128 # Squid's port
accessdeniedaddress = 'http://<dansguardian-fqdn>/cgi-bin/dansguardian.pl'
forwardedfor = on
loglocation = '/var/log/dansguardian/access.log'
Create the DansGuardian log file and give it proper permissions:
$ sudo mkdir /var/log/dansguardian
$ sudo touch /var/log/dansguardian/access.log
$ sudo chown -R nobody:nobody /var/log/dansguardian
$ sudo chmod -R 0600 /var/log/dansguardian
Enabling DansGuardian during boot-time
In order to enable DansGuardian during boot-time add the following lines to your /etc/rc.conf file:
# Enable DansGuardian
dansguardian_enable="YES"
Firewall configuration in PF for DansGuardian
Just like we did in the Squid configuration chapter of this handbook where we did modifications to our /etc/pf.conf file for transparent proxy, in this chapter of the handbook we will modify again /etc/pf.conf so that all HTTP requests are going through DansGuardian instead.
Below is an example configuration of /etc/pf.conf file for our Squid and DansGuardian setup:
ext_if = "<external-interface>"
int_if = "<internal-interface>"

# --- IP given by the ISP ---
ip_addr = "x.x.x.x"

# --- squid server ip address (usually the localhost) ---
SQUID_SERVER = "x.x.x.x"

# --- squid port ---
SQUID_PORT = "3128"

# --- dansguardian port ---
DG_PORT = "8080"

# --- hosts with internet access from the private network ---
table <allowed> { 10.1.16.0/20 }

# --- openvpn clients subnet ---
table <openvpn_clients> { 10.1.32.0/20 }

# --- OPTIONS section ---
set skip on lo0
set block-policy return

# --- SCRUB section ---
scrub in all

# --- TRANSLATION (NAT/RDR) section ---
nat on $ext_if from <allowed> to any -> $ip_addr
nat on $ext_if from <openvpn_clients> to any -> $ip_addr

# --- redirect HTTP traffic to the Squid server on the firewall ---
rdr on $int_if inet proto tcp from any to any port www -> $SQUID_SERVER port $DG_PORT

# --- FILTER RULES ---

# --- default policy ---
block log all

# --- antispoof protection ---
antispoof quick for $ext_if inet
antispoof quick for $int_if inet

# --- INTERNAL interface ---

pass in quick on $int_if inet from <allowed> to any keep state
pass in quick on $int_if inet from <openvpn_clients> to any keep state
pass out quick on $int_if inet from any to any keep state

# --- EXTERNAL interface ---

pass out quick on $ext_if inet from any to any keep state
The only difference here is that now we are redirecting all HTTP traffic to DansGuardian first which in turn passes it to Squid.
This way DansGuardian is taking care of the content filtering first.
Reload pf(4) rules using pfctl(8).
$ sudo pfctl -f /etc/pf.conf
Staring DansGuardian
In order to start DansGuardian execute the command below:
$ sudo /usr/local/etc/rc.d/dansguardian start
And that was it! By now you should have a fully working setup with Squid transparent proxy and DansGuardian content filter.