
Installing Apache Web Server on FreeBSD
The Apache web server is a free open-source HTTP server, that powers most of the web servers accross the Internet.
It’s easy to install and to configure and runs on most UNIX and UNIX-like platforms.
For more information about Apache Web Server, please visit their home page at http://httpd.apache.org/
Requirements
- root access or sudo rights
Installation
In this documentation we will be installing Apache from the FreeBSD Ports Collection. So first make sure that your ports are updated and then proceed with the installation.
In the following document we also cover how to install Apache with PHP support and create SSL certificates for Apache.
Now let’s install:
# cd /usr/ports/www/apache22 && make install clean
When you execute the above command you will be prompted to select different modules support to be installed, along with Apache.
If you plan on using Apache together with a database backend for example MySQL or PostgreSQL, or LDAP, make sure you select the corresponding options as well. Otherwise you may safely leave the defaults if your only going to server simple HTML pages for example.
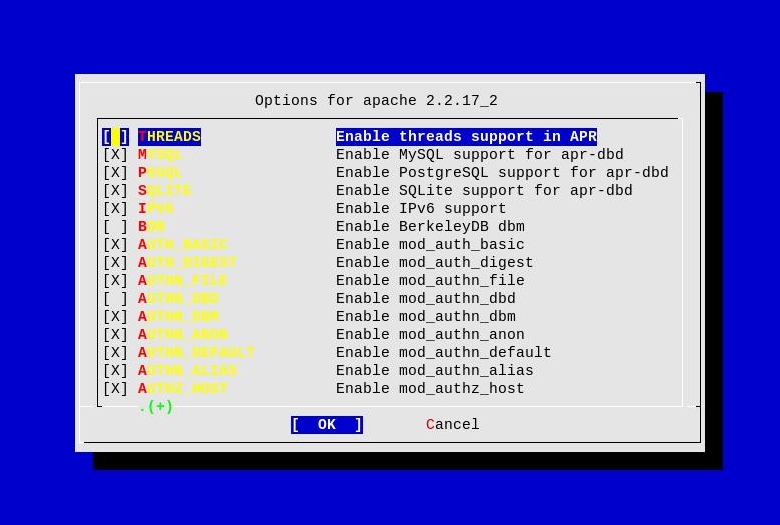
When ready select the OK button and press Enter. The Apache installation will start now. Once the installation is over you will see a similar output:
To run apache www server from startup, add apache22_enable="YES"
in your /etc/rc.conf. Extra options can be found in startup script.

Your hostname must be resolvable using at least 1 mechanism in
/etc/nsswitch typically DNS or /etc/hosts or apache might
have issues starting depending on the modules you are using.
===> Installing rc.d startup script(s)
===>   Compressing manual pages for apache-2.2.14_5
===>   Running ldconfig
/sbin/ldconfig -m /usr/local/lib
===>   Registering installation for apache-2.2.14_5
===> SECURITY REPORT:
This port has installed the following files which may act as network
servers and may therefore pose a remote security risk to the system.
/usr/local/lib/libapr-1.so.3

This port has installed the following startup scripts which may cause
these network services to be started at boot time.
/usr/local/etc/rc.d/apache22
/usr/local/etc/rc.d/htcacheclean

If there are vulnerabilities in these programs there may be a security
risk to the system. FreeBSD makes no guarantee about the security of
ports included in the Ports Collection. Please type 'make deinstall'
to deinstall the port if this is a concern.

For more information, and contact details about the security
status of this software, see the following webpage:
http://httpd.apache.org/
===>  Cleaning for pcre-8.02
===>  Cleaning for apache-2.2.14_5
Add the following lines to your /boot/loader.conf, otherwise when you first start Apache you will get warning messages. If you are installing Apache on jail system, you need to add the lines to the host system, not the jails itself:
# echo 'accf_http_load="YES"' >> /boot/loader.conf
# echo 'accf_data_load="YES"' >> /boot/loader.conf
Now load the above modules:
# kldload accf_http
# kldload accf_data
Installing PHP support for Apache
This step is optional if you do not plan on using PHP on your web server. So proceed only if you want PHP support installed on your system.
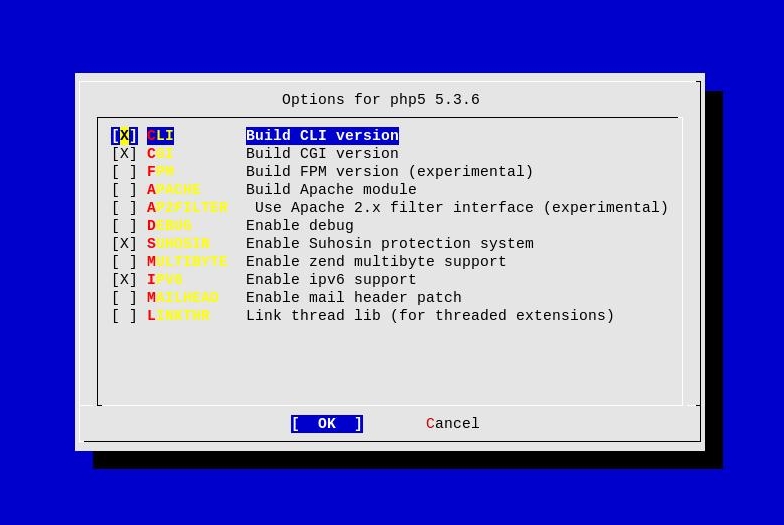
# cd /usr/ports/lang/php5 && make install clean
You will see the configuration menu for lang/php5. Make sure you select APACHE in the menu, in order to build an Apache module for PHP. You might also want to select the **MULTIBYTE **option in the menu.
Once the installation is over you should see something similar:
***************************************************************

Make sure index.php is part of your DirectoryIndex.

You should add the following to your Apache configuration file:

AddType application/x-httpd-php .php
AddType application/x-httpd-php-source .phps

***************************************************************
===>   Compressing manual pages for php5-5.3.2
===>   Registering installation for php5-5.3.2
===> SECURITY REPORT:
      This port has installed the following files which may act as network
      servers and may therefore pose a remote security risk to the system.
/usr/local/libexec/apache22/libphp5.so
/usr/local/bin/php
/usr/local/bin/php-cgi

      If there are vulnerabilities in these programs there may be a security
      risk to the system. FreeBSD makes no guarantee about the security of
      ports included in the Ports Collection. Please type 'make deinstall'
      to deinstall the port if this is a concern.

      For more information, and contact details about the security
      status of this software, see the following webpage:
http://www.php.net/
===>  Cleaning for php5-5.3.2
In case you need additional modules support for PHP like for example database support like MySQL, PostgreSQL you might want to install the lang/php5-extensions meta-port.
If you need different kind of support for PHP, just go ahead and install the lang/php5-extensions module, select the modules you need and then install them.
# cd /usr/ports/lang/php5-extensions && make install clean
Now we need to copy the php.ini configuration file for your PHP installation. There are a number of sample configuration files in /usr/local/etc, that are preconfigured for different setups, so copy the one that most suits your installation.
In this example I’m copying the php.ini-production file for my setup.
# cp /usr/local/etc/php.ini-production /usr/local/etc/php.ini
Now we can continue with the configuration of Apache and PHP.
Configuration of Apache
Now we are going to configure Apache and PHP. So let’s open the configuration file and make the needed changes.
The Apache configuration is located in /usr/local/etc/apache22 directory.
# vim /usr/local/etc/apache22/httpd.conf
The configuration of Apache is straight-forward and most of the configuration is already done for us. So we are just going to change a couple of things in the configuration.
If you have installed PHP support for Apache, as it was described in the previous step, add this line at the end of your Dynamic Shared Objects (DSO) Support section of your httpd.conf file. Do not add this line, in case you haven’t installed PHP support for Apache.
LoadModule php5_module libexec/apache22/libphp5.so
Find the following lines in your httpd.conf file and enter the need values - the web server administrator email and the web server name:
ServerAdmin you@example.com
ServerName  www.example.com:80
The below setting is needed only if you have already installed PHP support for Apache. Find the following lines in your httpd.conf:
#
# DirectoryIndex: sets the file that Apache will serve if a directory
# is requested.
#
<IfModule dir_module>
DirectoryIndex index.html
<IfModule>
And change the DirectoryIndex line according to this one:
#
# DirectoryIndex: sets the file that Apache will serve if a directory
# is requested.
#
<IfModule dir_module>
DirectoryIndex index.php index.php5 index.htm index.html
</IfModule>
Now find the following Include lines and uncomment them. These lines are commented by default in the httpd.conf file.
# Virtual hosts
Include etc/apache22/extra/httpd-vhosts.conf

# Various default settings
Include etc/apache22/extra/httpd-default.conf

# Secure (SSL/TLS) connections
Include etc/apache22/extra/httpd-ssl.conf
Add these lines at the end of the config file only if you have installed Apache with PHP support:
# Needed by the Apache PHP modules
AddType application/x-httpd-php .php
AddType application/x-httpd-php-source .phps
Now that we have configured the main Apache configuration file httpd.conf, we need to configure a couple of more files also from the /usr/local/etc/apache22/extra directory. So let’s go ahead and configure them.
Open for editing httpd-default.conf file:
# vim /usr/local/etc/apache22/extra/httpd-default.conf
Find the ServerTokens and ServerSignature lines and update them as follows:
ServerTokens Prod
ServerSignature Off
By default ServerTokens and ServerSignature are configured to reveal a lot of information about the system we are running Apache on, so this is just for security measures, since we don’t want to reveal any information to the outside world about our system.
Now we are going to configure the default Apache vhost:
# vim /usr/local/etc/apache22/extra/httpd-vhosts.conf
Here’s mine httpd-vhosts.conf file. Feel free to suit it for your needs:
#
# Virtual Hosts
#
# If you want to maintain multiple domains/hostnames on your
# machine you can setup VirtualHost containers for them. Most configurations
# use only name-based virtual hosts so the server doesn't need to worry about
# IP addresses. This is indicated by the asterisks in the directives below.
#
# Please see the documentation at
# <URL:http://httpd.apache.org/docs/2.2/vhosts/>
# for further details before you try to setup virtual hosts.
#
# You may use the command line option '-S' to verify your virtual host
# configuration.

#
# Use name-based virtual hosting.
#
NameVirtualHost *:80

#
# VirtualHost example:
# Almost any Apache directive may go into a VirtualHost container.
# The first VirtualHost section is used for all requests that do not
# match a ServerName or ServerAlias in any <VirtualHost> block.
#
<VirtualHost *:80>
    ServerAdmin admin@example.org
        ServerName example.org
        ServerAlias www.example.org

        DocumentRoot "/usr/local/www/apache22/data"

        <Directory "/usr/local/www/apache22/data">
                AllowOverride None
                Order Allow,Deny
                Allow from all
        </Directory>

    ErrorLog "/var/log/apache/httpd-example.org-error.log"
    CustomLog "/var/log/apache/httpd-example.org-access.log" common
</VirtualHost>
We have configured Apache and PHP. The next step shows you how to create SSL certificates for your Apache Web Server
If you do not want to have SSL certificates, please skip the next chapter, and proceed with starting your Apache Web Server.
Enabling SSL support for Apache
Now we are going to enable SSL support for our Apache Web server. First we need to generate the SSL certificates, so let’s create them:
Note that on this step you need to enter a passphrase for the server key:
# openssl genrsa -des3 -out server.key 2048
Generating RSA private key, 2048 bit long modulus
.......................................................................................................+++
....................+++
e is 65537 (0x10001)
Enter pass phrase for server.key:
Verifying - Enter pass phrase for server.key:
Now enter the following command. You will be asked about the passphrase you entered above. Enter the information you will be asked. Do not set a challenge password.
# openssl req -new -key server.key -out server.csr
Now enter the following command along with the server key passphrase you entered in the first step:
# openssl x509 -req -days 3650 -in server.csr -signkey server.key -out server.crt
Copy the files to /etc/ssl/apache and secure them:
# mkdir -p /etc/ssl/apache
# cp server.key server.csr server.crt /etc/ssl/apache/
# chmod -R 0400 /etc/ssl/apache
If you do not want to enter the passphrase each time you start Apache, you need to do the following. You will need to enter the passphrase for one last time:
# cd /etc/ssl/apache
# cp server.key server.key-orig
# openssl rsa -in server.key-orig -out server.key
Now that we have our certificates we need to tell Apache where to find them, so open httpd-ssl.conf file for editing, so we can configure our default SSL vhost.
# vim /usr/local/etc/apache22/extra/httpd-ssl.conf
Here’s mine httpd-ssl.conf file. Feel free to suit it for needs. Most of this configuration is already present in your httpd-ssl.conf file, so you will need just to edit the corresponding lines (most of the comments were removed to make it smaller):
Listen 443

AddType application/x-x509-ca-cert .crt
AddType application/x-pkcs7-crl    .crl

SSLPassPhraseDialog  builtin

SSLSessionCache        "shmcb:/var/run/ssl_scache(512000)"
SSLSessionCacheTimeout  300

SSLMutex  "file:/var/run/ssl_mutex"

##
## SSL Virtual Host Context
##

<VirtualHost *:443>

# General setup for the virtual host
ServerAdmin admin@example.org
ServerName example.org:443
ServerAlias www.example.org

DocumentRoot "/usr/local/www/apache22/data"

ErrorLog "/var/log/apache/httpd-example.org-ssl-error.log"
TransferLog "/var/log/apache/httpd-example.org-ssl-access.log"

#   SSL Engine Switch:
#   Enable/Disable SSL for this virtual host.
SSLEngine on

#   SSL Cipher Suite
SSLCipherSuite ALL:!ADH:!EXPORT56:RC4+RSA:+HIGH:+MEDIUM:+LOW:+SSLv2:+EXP:+eNULL

#   Server Certificate
SSLCertificateFile "/etc/ssl/apache/server.crt"

#   Server Private Key
SSLCertificateKeyFile "/etc/ssl/apache/server.key"

<FilesMatch "\.(cgi|shtml|phtml|php)$">
    SSLOptions +StdEnvVars
</FilesMatch>
<Directory "/usr/local/www/apache22/cgi-bin">
    SSLOptions +StdEnvVars
</Directory>

BrowserMatch ".*MSIE.*" \
         nokeepalive ssl-unclean-shutdown \
         downgrade-1.0 force-response-1.0

#   Per-Server Logging:
#   The home of a custom SSL log file. Use this when you want a
#   compact non-error SSL logfile on a virtual host basis.
CustomLog "/var/log/httpd-ssl_request.log" \

          "%t %h %{SSL_PROTOCOL}x %{SSL_CIPHER}x \"%r\" %b"
</VirtualHost>
Now let’s go ahead and start up our Apache Web Server!
Starting Apache
Now we can start our Apache Web Server. First let’s test our configuration for errors, before we start it.
# apachectl configtest
If the output says Syntax OK, then we are ready to go and start Apache, otherwise you will need to go back and fix the errors in the configuration files.
Start Apache:
# apachectl start
In order to start Apache during boot-time, add the following line to your /etc/rc.conf file:
apache22_enable="YES"
Now you should have a fully configured and running Apache Web Server.